Editing on line
Attivazione e configurazione
Introduction and main features
The editing settings are defined partly at the QGIS project level (editing form structure, widgets associated with individual attributes, 1:n and, in part, N:M relations) and partly at the Administration level (users with editing power, activation scale, alpha and geo constraints).
Thanks to the integration with the APIs of QGIS it is now possible to manage the main formats (geographically and not) supported by QGIS Server:
reading and editing mode
PostGreSQL/PostGis
SQLite/SpatiaLite
Oracle Spatial
GeoPackage
ShapeFile
reading mode
SQL Server
Virtual layer
Pay attention! An important note in relation to the formats supported in editing: please remember that only data on PostGreSQL/PostGis and Oracle Satial support multi-user editing.
Multi-user editing on formats such as Shapefile, but also GeoPackage and SpatiaLite, can lead to data corruption.
1:N and N:M relational editing
The editing function manages both direct editing on geometric and alphanumeric layers, and editing on layers in a 1:N or N:M relations, also both geometric and alphanumeric.
Attention: the management of the editing of the N: M relations is limited to the management of the 1:N relationship between the parent layer and the intermediate table.
This means that currently it is not possible to create new records in table M but only:
modify the current relations present
create new relations between new elements of layer N and pre-existing records of layer M
The editing settings are defined partly at the QGIS project level (editing form structure, widgets associated with individual attributes, 1:n and N:M relations) and partly at the Administration level (users with editing power, activation scale, alpha and geo constraints).
Multi-user editing
G3W-SUITE manages multi-user editing through a feature lock system.
It’s strongly recommended to allow multi-user editing only in the case of layers on the GeoDatabase and not on physical files.
Quando un utente abilitato attiva la funzione di editing a livello di client cartografico, le features visibili in mappa in quel momento saranno bloccate, relativamente all’aspetto di editing, per tutti gli altri utenti abilitati che potranno comunque editare features presenti fuori da tale estensione geografica.
In case of features of a layer locked by other users, the user will receive a warning message when starting the editing.
Tale blocco verrà disattivato al momento in cui l’utente uscirà dalla modalità di editing.
Impostazioni a livello di progetto QGIS
Definizione dei widget di editing associati ai singoli attributi
A livello di progetto QGIS, per ogni layer è possibile definire la struttura del form degli attributi associato alla visualizzazione dei risultati in seguito ad operazioni di interrogazione.
La stessa struttura sarà utilizzata in modalità di editing web per l’inserimento/modifica degli attributi associati alle features.
La definizione della struttura del form è gestibile, su QGIS, dalle Proprietà del vettore, nella sezione Attribute Form.

Conditionals forms based on QGIS expressions
Conditional forms based on QGIS expressions are supported and implemented for online editing/consulting.
It is therefore possible to define the visibility of a forms (form or group) and of the fields it contains, on the basis of the values defined on further fields when filling in the attributes.
Drill-down (cascading) forms
Drill-down (cascading) forms based on QGIS expressions are supported and implemented for online editing.
The functionality can be used to implement “drill-down” within editing forms, where the values available in one field depend on the values of other fields.
This function will be reflected in the consultation side.
Definizione dei widget di editing associati ai singoli attributi
A livello di progetto QGIS (sempre da Proprietà del vettore, sezione Attribute Form) è possibile definire per ogni attributi un alias e un widget di editing.
L’alias e i widget di editing definiti a livello di progetto saranno disponibili in fase di editing web con alcune limitazioni.
Di seguito si riportano i widget disponibili ed eventuali limitazioni:
Relation reference: with some option limitationCasella di controlloDate/time: management limited to the dateAllegato*IntervalloText editmultiline and html includedUnique values: this widget will be equipped with a pick layer tool at the cartographic client levelMappa valoriValue relationswithQGIS expression-based filtermanagement, the suite not supportsort by valueandallow multiple selectionsoptions
The expression-based filter can also be dependent on the values of other fields on the form and useful to create cascading drill down.
Relativamente al widget Allegato occorre precisare che l”associazione di un file multimediale ad una features prevede che tale file venga salavato su uno spazio dedicato (esposto sul web) sul server e che l’associazione avvenga tramite un URL che fa riferimento a tale file.
Questa soluzione permette di consultare gli allegati associati anche caricando il layer in oggetto direttamente da QGIS o da latro software GIS.
Ulteriori impostazioni a livello di singolo layer
In the Attribute Form section of the Layer Properties it is also possible to define for every field:
abilitare/disabilitare la modifica
vincoli di obbligatorietà e/o univocità*
range of acceptable values through the Range widget
eventuali valori predefiniti
conditional forms
QGIS expressions and default values
All the QGIS expressions can be used as default values.
The default values defined for individual fields at the QGIS project level are inherited from the suite.
In this case, at the online edit level, the form relating to the field thus defined will be self-calculated and can be set not editable by the user.
The result of the expression can also be dependent on the values of other fields on the form.
Very useful in all cases where we want the values of a field to be calculated automatically through the potential of QGIS expressions.
The Apply the default value also to the update option is supported.
As in QGIS the default values are displayed in the form during editing and not only after saving.
Editing tabelle relazionate in modalità 1:n
Nel caso in cui, a livello di progetto QGIS, siano stati associati ad un layer uno o più relazioni di tipo 1:n (menù Progetto → Proprietà…, sezione Relazioni), sarà possibile realizzare editing relazionale anche sulla piattaforma webgis.
Anche per le tabelle relazionate in modalità 1:n sarà possibile definire struttura del form degli attributi, alias e widget di editing a livelo di progetto QGIS.
Tali configurazioni e strumenti saranno automaticamente disponibili sulla piattaforma webgis.
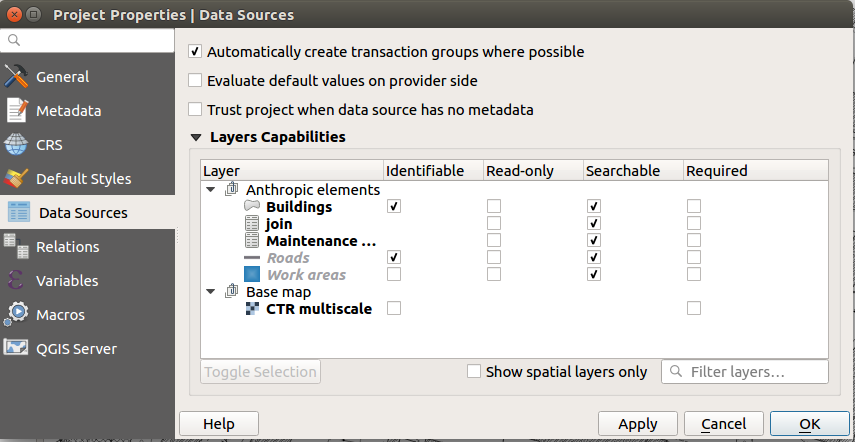
Gruppo di transazione
Utilizza gruppo di transazioni per modificare, salvare o ripristinare contemporaneamente le modifiche di più layers
Quando lavori con layer aventi stessa sorgente (es. layer gestiti sullo stesso DB PostGreSQL), attiva l’opzione Crea automaticamente gruppi di transazioni dove possibile in Progetto → Proprietà …. → Sorgenti di dati per sincronizzare il loro comportamento (entrare o uscire dalla modalità di modifica, salvare o ripristinare le modifiche allo stesso tempo).
Impostazioni di Amministrazione
Activation of on-line editing on a single layer
Per attivare le funzioni di editing on line su un layer occorre accedere, all’interno del pannello di amministrazione di G3W-ADMIN, alla sezione Lista layers del progetto stesso.
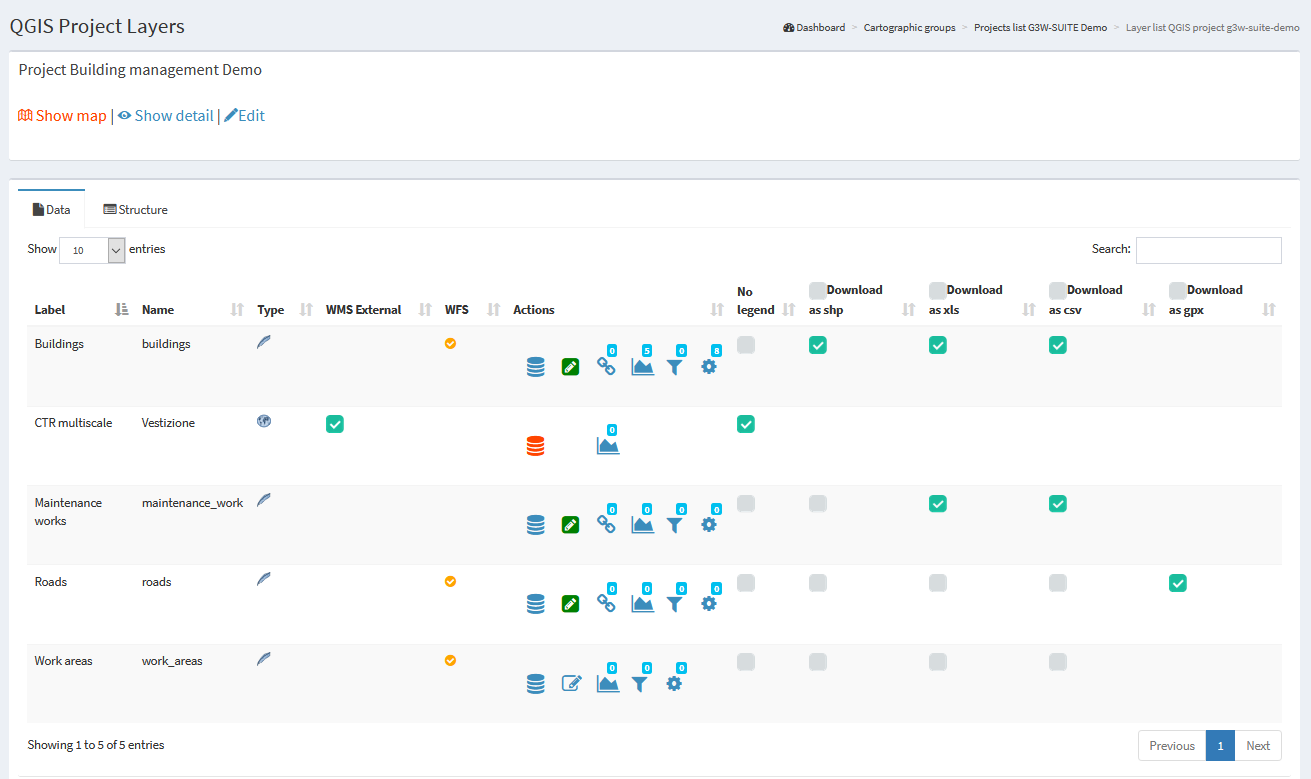
Nella lista dei layer si identifica il layer su cui si vuole attivare la funzione di editing e si clicca sull’icona Editing layer ![]() posta sulla sinistra.
posta sulla sinistra.
Attenzione: controlla che il formato del layer sia tra quelli supportati da QGIS per la funzione di editing
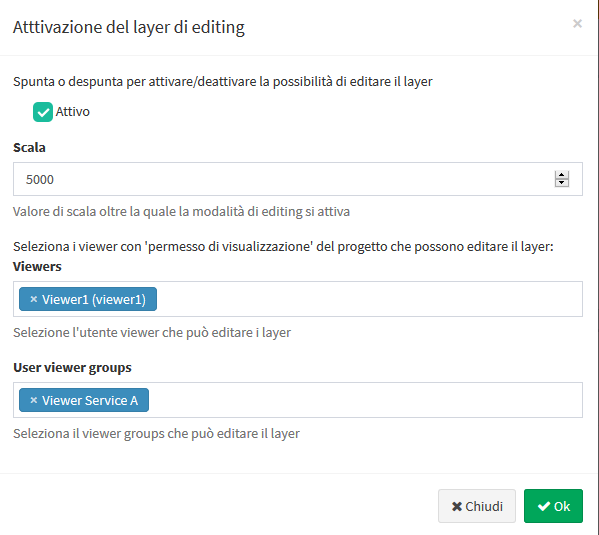
Cliccando sull’icona si aprirà una finestra modale che permetterà di:
definire la scala a cui sarà possibile attivare la funzione di editing a livello di webgis (solo per tabelle geometriche)
definire gli utenti di tipo Viewer (singoli o gruppi) abilitati all’editing on line
For each user (single or group) it is possible to discriminate the editing powers:
Add: add feature, copy feature, add part to multipart
Update geometry: update vertex feature, move feature, add part to multipart, delete part from multipart, split features, dissolve features
Update attributes: update feature attributes, update attributes of selected features
Delete: delete features
I should be noted that:
gli utenti Viewers (singoli o gruppi) disponibili nel menù a tendina saranno limitati a quelli che hanno permesso di accesso in consultazione al progetto WebGis in cui è contenuto il layer
utenti di tipo Editor I e Editor II “proprietari” del progetto risultano abilitati di default alla funzione di editing on line
NB: In case a user belongs to a user group, the permissions set will be added together.
Ability to associate references to create/update G3W-SUITE users
Through these two optional settings it is possible to define two fields of the table of the layer being edited automatically filled in.
These two fields will contain references to G3W-SUITE users who creators or modifiers of the individual features edited.
All settings defined at the QGIS level for these fields (eg default values) will no longer be considered.
It is recommended that these fields be set as non-editable at the project level.
Activation of online editing on multiple layers at the same time
In the case of a project in which it is necessary to activate the online editing function on many layers, by defining the same options for each of them it is possible to use the Project layer action function.
![]()

Editing di dati relazionati 1:N
Per permettere l’editing sulla tabella relazionata in modalità 1:n con un layer occorre attivare (sempre con le stesse modalità) la funzione di editing anche per la tabella relazionata presente nella lista dei layer del progetto.
Creazione di vincoli
G3W-SUITE permette di gestire due tipologie di vincoli:
alphanumeric (SQL) / QGIS expressions constraints
geographic constraints
Both work in terms of visualization and/or editing
Alphanumeric (SQL) / QGIS expressions Constraints
Alphanumeric (SQL) / QGIS expression constraints allow you to define, for each published layer, the subset of features that can be viewed and/or edited by individual users and/or groups of users.
This setting is also available for the AnonymousUser user
Per attivare questo tipo di vincolo occorre cliccare, sempre a livello della lista dei layers del progetto, sull’icona Gestisci constraint alfanumerici per la visualizzazione e l'editing ![]() .
.
Cliccando sull’icona si aprirà la lista degli eventuali vincoli già presenti e la voce + Nuovo vincolo alfanumerico per creare un nuovo constraints.

Cliccando sulla voce + Nuovo vincolo alfanumerico si aprirà una finestra modale che permetterà di definire un nome e una descrizione da associare al vncolo
In the form it is possible to specify whether this filter will act at the level:
display only
editing only
in both cases

Dopo aver premuto sul tatso OK, il vincolo apparirà nella lista e potrà essere parametrizzato secondo due modalità
 Linguaggio del provider / Dialetto SQL
 Espressioni di QGIS
Linguaggio del provider / Dialetto SQL
Cliccando sull”icona ![]() si aprirà una finestra modale che, premendo il tastopulsante verde, ti permetterà di definire, per ogni utente e/o gruppo diutenti, le regole dei vincoli.
si aprirà una finestra modale che, premendo il tastopulsante verde, ti permetterà di definire, per ogni utente e/o gruppo diutenti, le regole dei vincoli.
Le singole regole devono essere definite tramite il linguaggio del provider o il dialetto SQL associato al formato del layer (es. usa SQL standard se il tuo livello di vincolo geografico è un livello PostGis)
Le singole regole devono far riferimento agli attributi e ai valori del layer di riferimento
L’icona Salva ![]() permetterà di validare la regola, ciò allo scopo di garantire un corretto funzionamento del constraints stesso.
permetterà di validare la regola, ciò allo scopo di garantire un corretto funzionamento del constraints stesso.
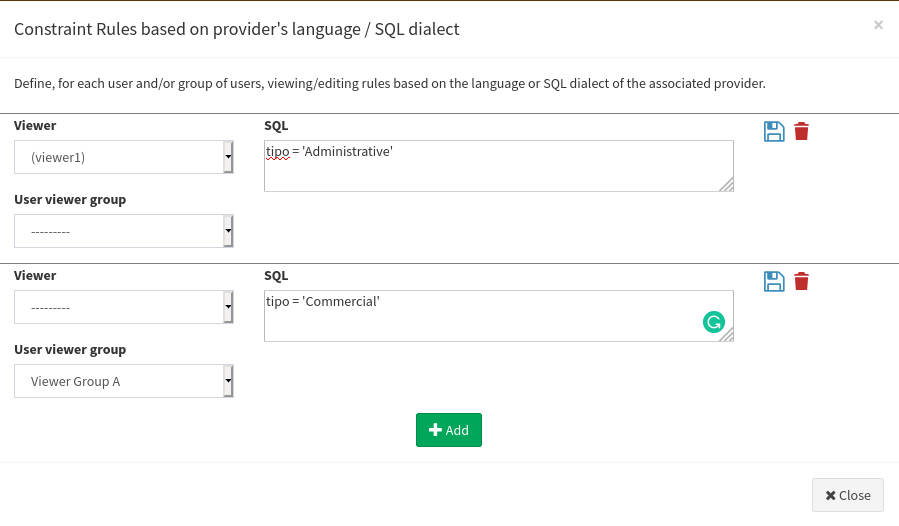
Una volta inseriti e validati tutti i vincoli si cliccherà sul tasto Chiudi per confermare le regole.
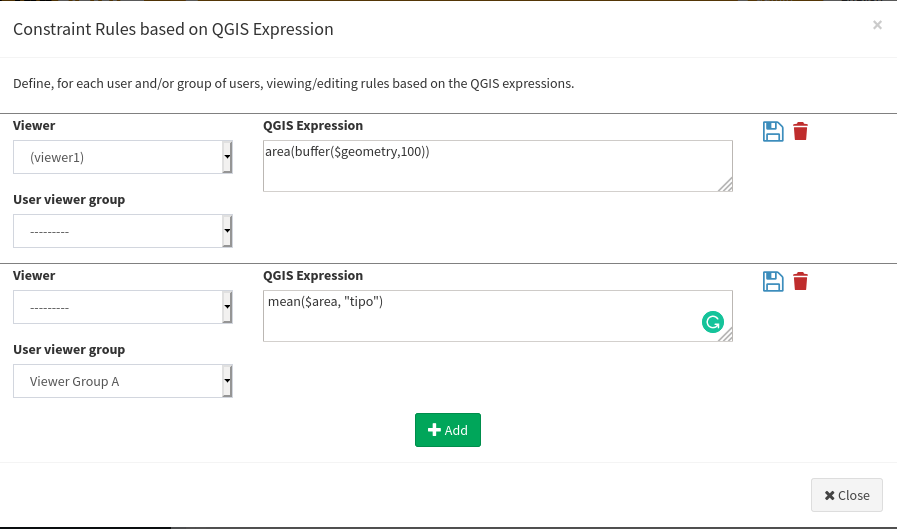
Regole basate su espressionidi QGIS
Cliccando sull”icona Regole secondo le espressioni QGIS ![]() si aprirà infatti una finestra modale che, tramite il tasto
si aprirà infatti una finestra modale che, tramite il tasto  , permetterà di definire, per ogni utente e/o gruppo di utenti, le regole del vincolo
Le singole regole devono essere definite tramite le espressioni QGIS e ciò consenteavere un elevato grado di libertà nella costruzione delle stesse.
Vedi il paragrafo dedicato alle funzioni disponibili direttamente sulManuale QGIS.
L’icona Salva ![]() permetterà di validare la regola, ciò allo scopo di garantire un corretto funzionamento del constraints stesso.
permetterà di validare la regola, ciò allo scopo di garantire un corretto funzionamento del constraints stesso.
Una volta inseriti e validati tutti i vincoli si cliccherà sul tasto Chiudi per confermare le regole.
In the dedicated panel it will be possible to check, modify and delete the defined rules.

Constraints geografici
The online editing function also allows you to manage geo-constraints that allow the user to view and/or edit features only if they intersect or are contained within specific features of a second polygonal layer.
This setting is also available for the AnonymousUser user
Per attivare un vincolo geografico occorre cliccare, sempre a livello della lista dei layers del progetto, sull’icona Gestisci constraints geografici ![]() che apparirà una volta attivata la funzione di editing on line.
che apparirà una volta attivata la funzione di editing on line.
Cliccando sull’icona si aprirà la lista degli eventuali vincoli già presenti e la voce + Nuovo vincolo geografico per creare un nuovo geo-constraints.

Cliccando sulla voce + Nuovo vincolo geografico si aprirà una finestra modale che permetterà di definire il layer poligonale (tra quelli presenti nel progetto) su cui dovrà basarsi il vincolo stesso.
In the form it is possible to specify whether this filter will act at the level:
display only
editing only
in both cases

Un volta definito il layer il vincolo apparirà nella lista e potrà essere parametrizzato tramite l’icona Rules.![]()
Cliccando su tale icona si aprirà infatti una finestra modale che, tramite il tasto , permetterà di definire, per ogni utente e/o gruppo di utenti, la/le features del layer definito come geo-constraints, all’interno delle quali sarà permesso l’editing.
Le singole regole devono essere definite utilizzando il linguaggio o il dialetto SQL del provider (es. usa standard SQL se il layer di riferiemnto per il vicncolo è un layer PostGis
Le singole regole devono far riferimento agli attributi e ai valori del layer di riferimento
L’icona Salva ![]() permetterà di validare la regola, ciò allo scopo di garantire un corretto funzionamento del constraints stesso.
permetterà di validare la regola, ciò allo scopo di garantire un corretto funzionamento del constraints stesso.

Una volta inseriti e validati tutti i vincoli si cliccherà sul tasto Chiudi per confermare le regole.
La lista dei vincoli alfanumerici riporterà un sommario delle regole settate

Strumenti di editing on line a livello di client cartografico
Geographic and alphanumeric editing
Once the online editing function has been activated and configured on one or more layers of a WebGis project, the Editing item, inside the Tools menu of the cartographic client, will be shown.
In the case of many editable layers, a useful filter allows you to view only the layers of interest in the list.
If the editing function is activated at the Admin level, it is also possible to start the online editing also through the Editing icon that appears at the level of the search and query results form of a vector layer.
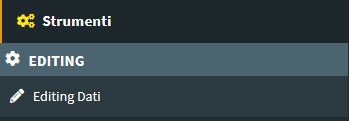
Cliccando sulla voce Editing dati il menù laterale mostrerà gli strumenti di editing per tutti i layer su cui è attivata tale funzione.
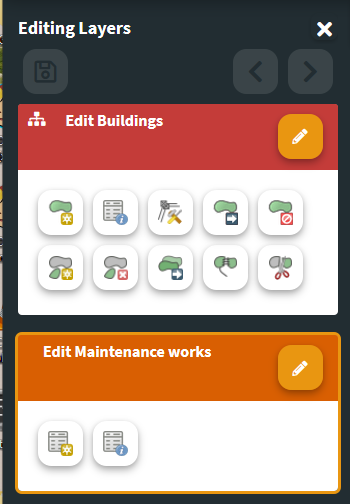
L’attivazione effettiva della funzione di editing per i singoli layer avverrà cliccando sull’icona Modifica layer.
Creare ed editare features
Gli strumenti a disposizione sono i seguenti:
Strati geometrici
 Aggiungi feature: per aggiungere una feature alla tabella geometrica
 Update feature attribute: to modify the attribute values associated with an existing feature
 Aggiorna vertici features: per modificare la forma di una geometria
 Cancella feature
 Update attributes for selected features: to modify the attribute values associated with more than one features
 Muovi feature: per spostare una geometria
 Paste features from other layers: query another layer with the same geometry, select the features to copy, press the
 Pasteicon, select the features to paste and confirm. The copy and paste operation can also be performed by referring to geometries deriving from layers added by the user using the AddLayer tool. Copy features: to copy one or more features from the same layer
 Add part of a multi-geometry
 Delete part of a multi-geometry
 Taglia features: per taglaire una o più geometrie eduplicare i relativi attributi
 Dissolvi features: per fondere due o più geometrie ed i relativi attributi
Un pannello di aiuto descriverà i passi da compiere per le operazioni di copy, dissolve and split.
In case of interaction of the editing tools with overlapping geometries, an intermediate step will allow to select the effective geometry on which to operate.
Snap and other available function
Activating the Add features and Update feature vertex tools allows you to:
activate the intralayer snap function
activate the snap between layers, but only if both layers are in editing mode
activate the interactive area and length measure function
Layer alfanumerci
 Aggiungi features: per aggiungere un record alla tabella alfanumerica
 Modifica features: per modificare gli attributi di un record esistente
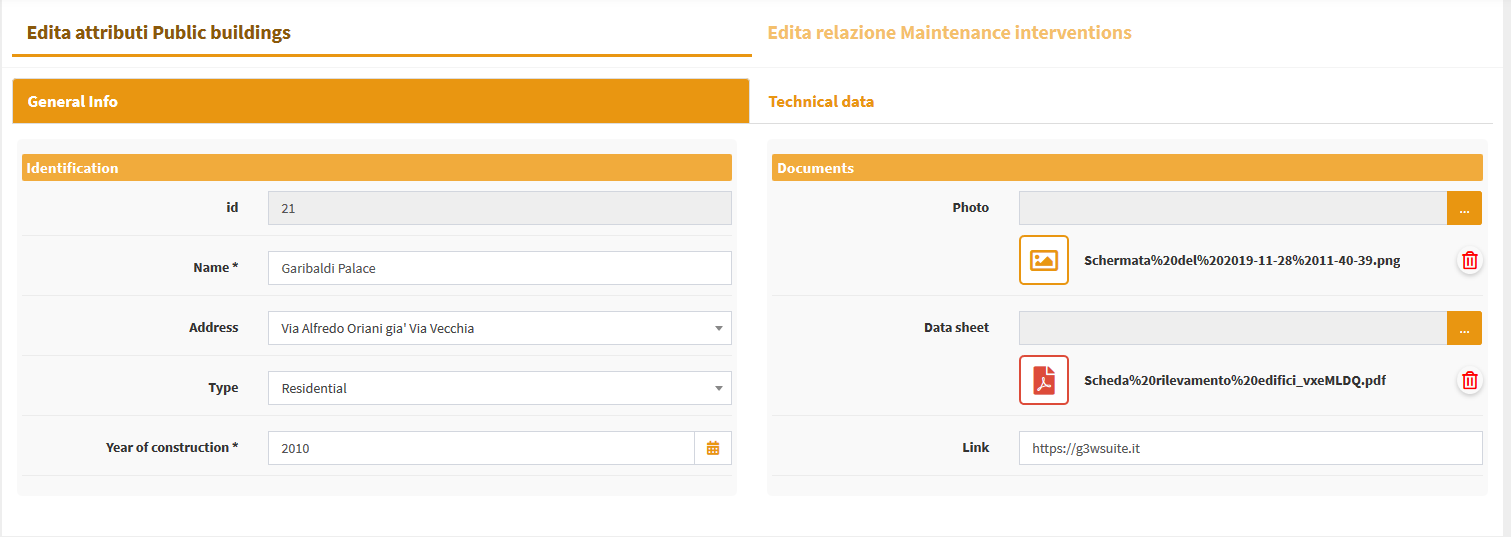
Ogni volta che si aggiungerà una nuova feature/record o si andrà a modificare una feature/record esistente sul client verrà visualizzato il form di editing degli attributi ed i rispettivi widget di editing come definiti a livello di progetto QGIS.
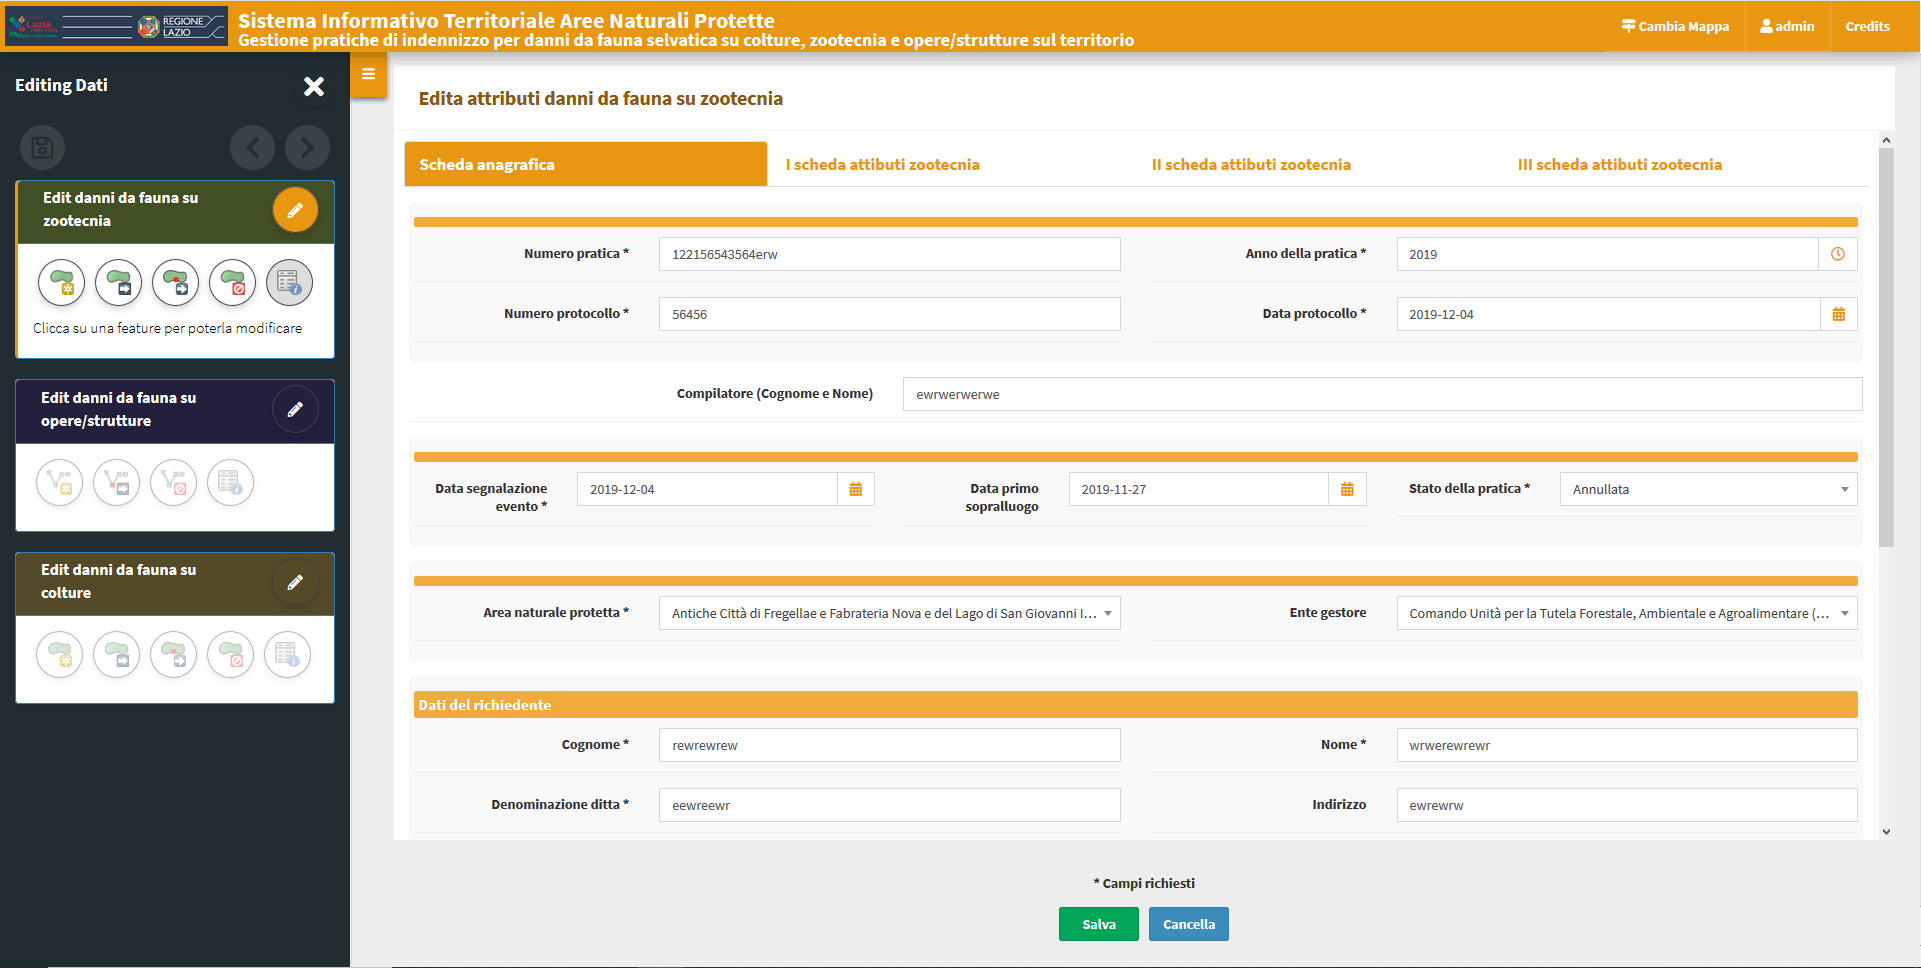
Eventuali campi obbligatori saranno contrassegnati con un asterisco.
Eventuali vincoli non soddisfatti saranno evidenziati con messaggi di warning specifici riportati in rosso.
Le modifiche apportate potranno essere salvate solo dopo aver soddisfatto eventuali vincoli di obbligatorietà e/o univocità.
Per tale motivo il tasto SALVA sarà disabilitato fino a quando non saranno soddisfatti tutti i constraints.
1:N and N:M related tables editing
G3W-SUITE permette di realizzare editing relazionale; perché ciò sia possibile occorre che:
on the published QGIS project there are one or more geographic layers related (1:n or N:M) with one or more alphanumeric tables
sul pannello di amministrazione sia stata attivata la funzione di editing sia sul layer padre che sui layer figli
l’utente operatore sia abilitato alla funzione di editing su tali layer
L’attivazione, a livello di client cartografico, della modalità di editing sul layer padre determina, automaticamente, la possibilità di andare a gestire anche le informazioni sulla tabella relazionata.
Important: to be able to edit related data, the relations must be inserted in the form of the parent layer, defined using the Drag and Drop designer method in the Layer Properties.
After the editing has been activated on a record in the parent table, an editing icon (pen) will appear at the level of the relations references.
Spostandosi sulla macro scheda relativa ad uno dei layer figli verrà visualizzata la lista dei records già associati alla feature editata
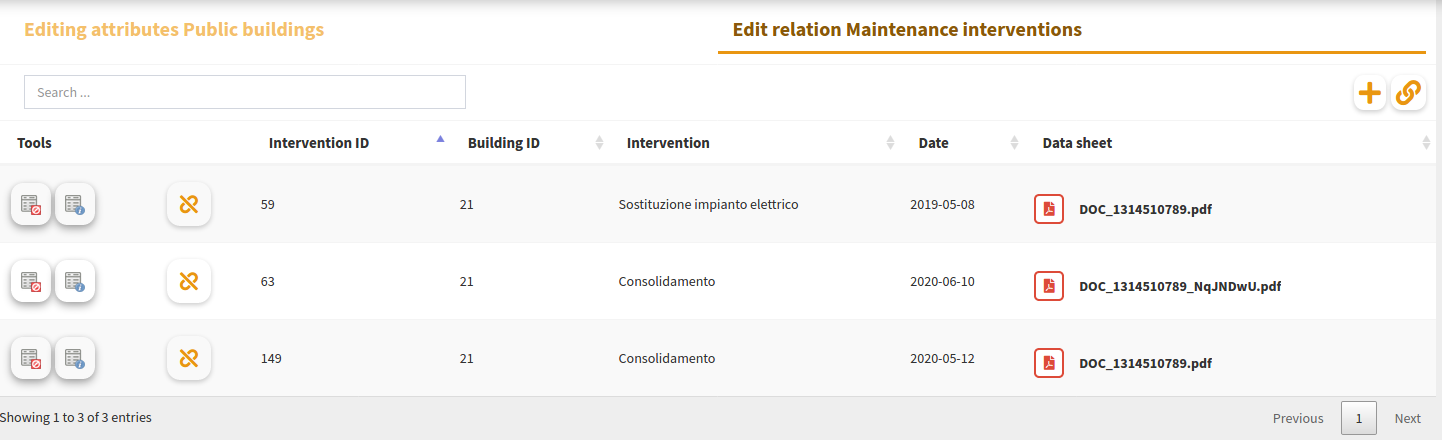
Clicking on it the form switch in a session dedicated to the edit of the relational table where it will be possible: * create and add a new records related to the edited feature
associare un records esistente (collegato ad altre features o orfano) alla feature editata
modificare i records attualmente associati alla feature editata
Creation of a new related child records
Cliccando sull’icona Crea ed aggiungi una nuova relazione ![]() (posta in alto a destra) si aprirà il form degli attributi relativo al layer figlio in oggetto (eventualmente strutturato come da progetto QGIS).
(posta in alto a destra) si aprirà il form degli attributi relativo al layer figlio in oggetto (eventualmente strutturato come da progetto QGIS).
Sarà compilare i singoli attributi e salvare il nuovo record. La modifica deve essere validata cliccando sul tasto Salva in fondo alla scheda.
If the child layer is of the geometric type, it will be possible to add a new feature in two ways:
classic geometry editing
copy and paste a feature from other layers (WFS included) present in the project and characterized by the same type of geometry
To copy a geometry from another layer operate in this order:
select the layer from which to copy the geometry from the drop-down menu
click on the Copy button on the right of the list
click on the feature of the layer to copy from
select the feature of interest by consulting its attributes and/or zooming in on it, only one feature per operation
fill in the attribute form of the pasted feature, some fields may already be filled in if they are omonymus to those of the feature”s origin layer
Associazione di un record già esistente
Cliccando sull’icona Collega relazioni esistenti a questa feature ![]() (posta in alto a destra) si potrà associare un record, già collegato ad altre features o orfano, alla feature editata.
(posta in alto a destra) si potrà associare un record, già collegato ad altre features o orfano, alla feature editata.
Nella nuova finestra visualizzata:
la lista di tutti i records orfani o associati alle altre features;
un filtro generico permetterà di individuare il record di interesse;
cliccando sul checkbox posto in testa ai singoli record e cliccando il tasto Salva, tali records verranno associati alle feature editata ed, eventualmente, dissociati da altre features
Modifica di un record già associato
Alla destra di ogni records associato alla feature editata compaiono una serie di icone:
 Annulla relazione: per dissociare il record dalla feature editata, il record non verrà cancellato ma diverrà orfano
 Elimina feature: eliminare definitivamente il record
 Modifica feature: modificare i valori associati agli attributi di tale record; la modifica deve essere validata cliccando sul tasto Salva in fondo alla scheda.
Salvataggio modifiche
Saving all the changes made in an editing session can be done in three ways:
by clicking on the
diskette icon placed at the top right. This icon is very useful in the case of complex projects with related data on various levels as it allows you to save any changes made regardless of the form on which you are at the time of saving. You will not be asked to confirm the save.
by clicking on the
diskette icon placed at the top left of the TOC. The icon will only be active once you exit the attribute editing form. The changes made will be saved and you can continue making new changes. You will not be asked to confirm the save.
bexiting edit mode by clicking on the
Edit layer icon .
.
BExiting edit mode, a modal window will be displayed which will show the list of changes made and the request for confirmation or not of saving them.
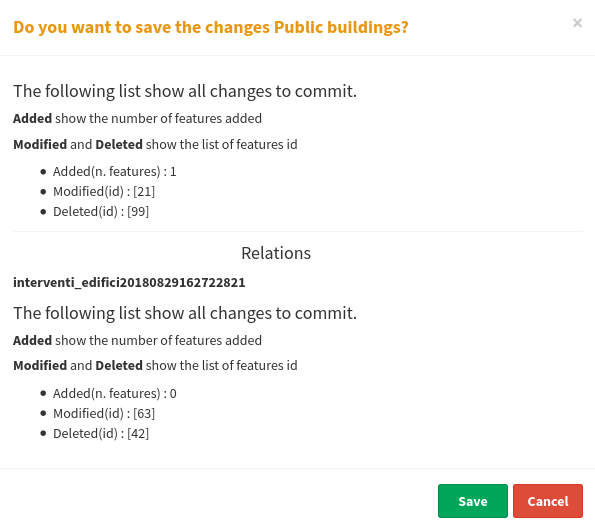
Remember that during the editing phase the undo/redo icons allow you to delete/restore the latest changes made.